
Tuesday, August 29
Adding drain and standpipe to closed-head HDPE drum
The "standard" solution for creating a wash tank or oil storage tank seems to be flipping closed-head drums over, and cutting the heads off. I've been trying to find a viable solution that will let me add a bottom drain and standpipe to closed-head drums, so I don't have to deal with all the nasty issues you get with an open head, such as methanol fumes or rain water. Oh, and it also should be able to be performed without welding, since I can't do that, and would ideally work on HDPE drums that I've gotten from carwashes.
Finally, I've found out a method that works, and is (relatively) cheap, especially since it lets me use free drums. So far, I've been able to install 2 bottom drains and 2 stand-pipes without cutting off the head of the drum, and it seems to work great. The key is to get a male and female fitting on either side of the drum, so you can screw/glue fittings onto the bottom. Here are the steps:
Materials List:
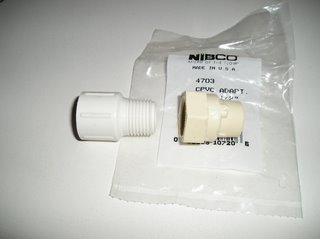
~ 1/2" male PVC fitting, threaded
~ 1/2" CPVC adapter, threaded PVC to slip CPVC (NIBCO part 4703 at Home Depot)
~ 1 3/32" shower valve socket wrench
(I had to buy the complete kit at Home Depot - $22 !!! )
~ 1 small tube Gorilla Glue
~ 1 tube silicone caulk (indoor/outdoor)
~ standard hose washer
~ 3/4" galvanized iron pipe, 4' long
~ 3/4" galvanized tee
~ 2 - 3/4" galvanized 10" pipe nipples
~ 2 - 3/4" galvanized end caps (optional)
~ 1 - bolt, nut, washer, lock washer
Assembling the fitting wrench:
1) Insert the shower valve socket wrench over the end of the 4' pipe, making sure you put the right end on (make sure the CPVC adapter fits inside the fitting).
2) Drill through the iron pipe, through the hole in the top of the shower valve socket wrench. Drill through both holes.

3) Insert bolt through the hole you just drilled, put washer and lock washer on bolt, then nut, and tighten. It shouldn't stick out very far, since you want it to fit through a 2" fitting.
4) Thread the 3/4" Tee onto the other end of the pipe, and the two nipples onto the tee. Put end caps on the nipples if you like. You can hand-tighten all these. I chose galvanized so it wouldn't rust from exposure to water.
You now have a wrench that can tighten fitting in the bottom of a drum!
Now, for the fitting assembly:
Step 1: Drill a 3/4" hole in the bottom of the drum, directly below one of the top bungs. 3/4 is slightly too small, and 13/16 is slightly too big (but OK), so your mileage may vary. If you're just adding a bottom drain, use a 3/4" bit, so it will hold itself while the glue sets.
Step 2: Put on gloves, because Gorilla Glue stains human skin!
Step 3a: Trial run for fit. Put a standard hose washer on a male 1/2" PVC fitting, and screw it by hand into the hole you drilled, trying to keep it as straight as possible. Look into the drum, to see how much thread is available. Depending on the thickness of the HDPE, you may not have enough thread sticking out with the hose washer on the fitting to attach on the inside. (If you're just adding a bottom drain, you don't need threads, provided it's a VERY snug fit. If you want a stand pipe, you're going to want threads.) If enough threads aren't showing (the fitting is nearly flush on the inside), take off the hose washer, or push it higher up on the fitting, and try again. Now, take it out of the hole, and proceed with glue.
Step 3b: Rub a bit of water on the fitting, and around the hole. Put a liberal but not insane amount of gorilla glue at the top of the threads (the middle of the fitting), and around the hole you drilled in the drum.
Step 4: Screw the male fitting back into the hole. If all you wanted was a bottom drain, you're done.
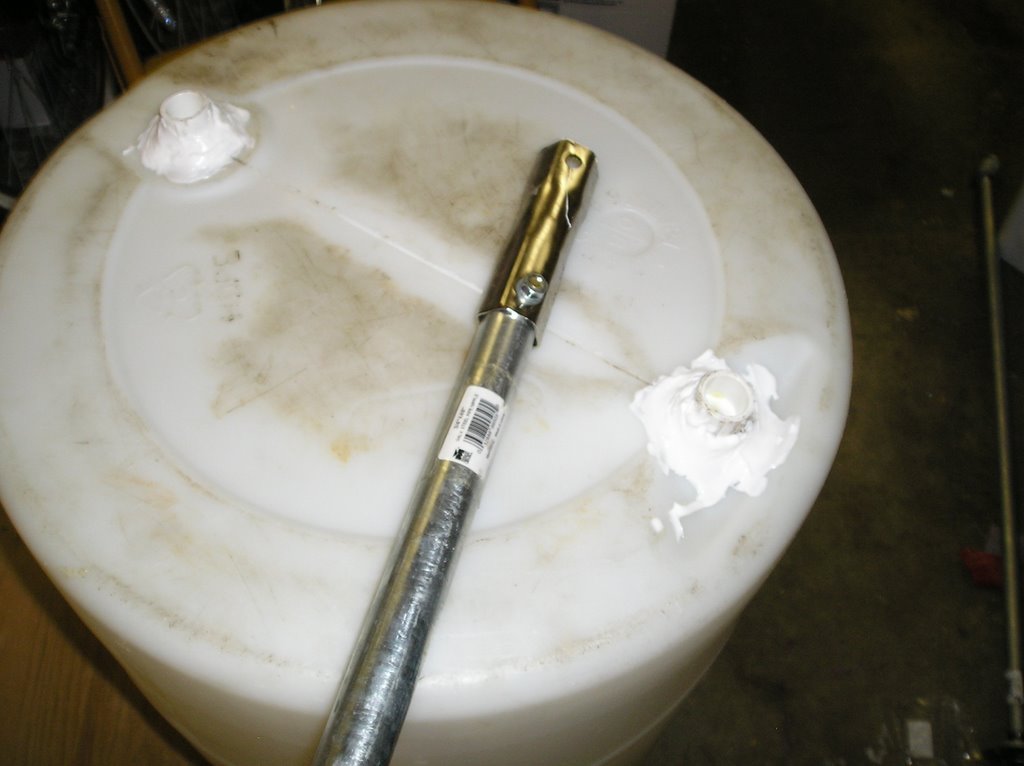
Step 5: Put the 1/2" CPVC fitting on the 4' fitting wrench you made. I had real problems with it falling out or going to deep, so I stuffed some plastic bag down inside the fitting, and put a bit of ABC chewing gum on the inside side of the wrench to hold the CPVC fitting. I also put a liberal amount of gorilla glue on the threads and on the surface of the fitting that will be in contact with the drum.
I found the next few steps easiest with the drum on it's side, on a few milk crates.
Step 6: Insert the wrench into the drum, and position over the fitting. If your drum has two top bungs, look through one while putting the wrench through the other.

Step 7: Have a friend hold the bottom fitting you already inserted, with a set of channel locks or pliers, while you screw the fitting on, hand-tight.
Step 8: After the gorilla glue cures overnight, apply a liberal amount of silicone caulk around the fitting and allow that to cure for a day.
After it's cured, you can add a stand pipe. Here's how I did it....
I used another CPVC adapter, and screwed it onto a 1/2" pipe, and then put a 10" length of 1/2" PVC pipe lightly into the CPVC adapter, WITHOUT glue. I used PVC primer and glue on the other end of the 10" pipe, then inserted it into the drum and pushed it onto the CPVC adapter I'd already installed. I let that cure overnight, then twisted it loose, leaving behind the 10" stand pipe.
Please comment with opinions, rants, or reports of success/failures with this methodology.
Finally, I've found out a method that works, and is (relatively) cheap, especially since it lets me use free drums. So far, I've been able to install 2 bottom drains and 2 stand-pipes without cutting off the head of the drum, and it seems to work great. The key is to get a male and female fitting on either side of the drum, so you can screw/glue fittings onto the bottom. Here are the steps:

Materials List:
~ 1/2" male PVC fitting, threaded
~ 1/2" CPVC adapter, threaded PVC to slip CPVC (NIBCO part 4703 at Home Depot)
~ 1 3/32" shower valve socket wrench
(I had to buy the complete kit at Home Depot - $22 !!! )
~ 1 small tube Gorilla Glue
~ 1 tube silicone caulk (indoor/outdoor)
~ standard hose washer
~ 3/4" galvanized iron pipe, 4' long
~ 3/4" galvanized tee
~ 2 - 3/4" galvanized 10" pipe nipples
~ 2 - 3/4" galvanized end caps (optional)
~ 1 - bolt, nut, washer, lock washer
Assembling the fitting wrench:
1) Insert the shower valve socket wrench over the end of the 4' pipe, making sure you put the right end on (make sure the CPVC adapter fits inside the fitting).
2) Drill through the iron pipe, through the hole in the top of the shower valve socket wrench. Drill through both holes.
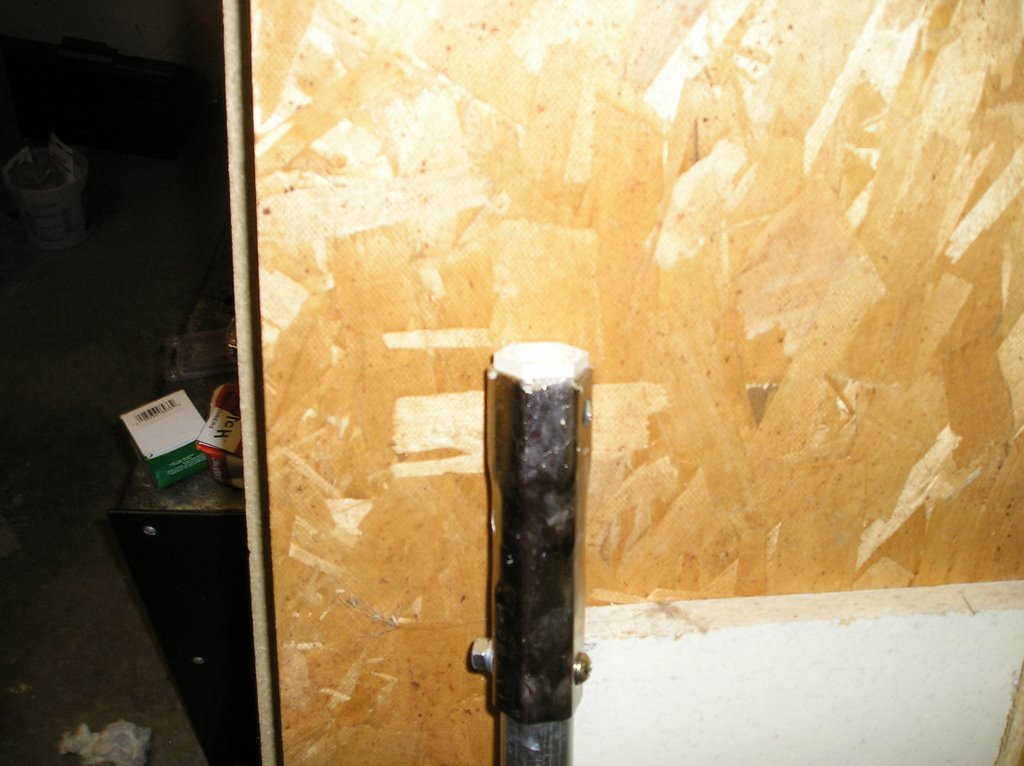
3) Insert bolt through the hole you just drilled, put washer and lock washer on bolt, then nut, and tighten. It shouldn't stick out very far, since you want it to fit through a 2" fitting.
4) Thread the 3/4" Tee onto the other end of the pipe, and the two nipples onto the tee. Put end caps on the nipples if you like. You can hand-tighten all these. I chose galvanized so it wouldn't rust from exposure to water.
You now have a wrench that can tighten fitting in the bottom of a drum!
Now, for the fitting assembly:
Step 1: Drill a 3/4" hole in the bottom of the drum, directly below one of the top bungs. 3/4 is slightly too small, and 13/16 is slightly too big (but OK), so your mileage may vary.
 If you're just adding a bottom drain, use a 3/4" bit, so it will hold itself while the glue sets.
Step 2: Put on gloves, because Gorilla Glue stains human skin!
Step 3a: Trial run for fit. Put a standard hose washer on a male 1/2" PVC fitting, and screw it by hand into the hole you drilled, trying to keep it as straight as possible. Look into the drum, to see how much thread is available. Depending on the thickness of the HDPE, you may not have enough thread sticking out with the hose washer on the fitting to attach on the inside. (If you're just adding a bottom drain, you don't need threads, provided it's a VERY snug fit. If you want a stand pipe, you're going to want threads.) If enough threads aren't showing (the fitting is nearly flush on the inside), take off the hose washer, or push it higher up on the fitting, and try again. Now, take it out of the hole, and proceed with glue.
Step 3b: Rub a bit of water on the fitting, and around the hole. Put a liberal but not insane amount of gorilla glue at the top of the threads (the middle of the fitting), and around the hole you drilled in the drum.
Step 4: Screw the male fitting back into the hole. If all you wanted was a bottom drain, you're done.
Step 5: Put the 1/2" CPVC fitting on the 4' fitting wrench you made. I had real problems with it falling out or going to deep, so I stuffed some plastic bag down inside the fitting, and put a bit of ABC chewing gum on the inside side of the wrench to hold the CPVC fitting. I also put a liberal amount of gorilla glue on the threads and on the surface of the fitting that will be in contact with the drum.
I found the next few steps easiest with the drum on it's side, on a few milk crates.
Step 6: Insert the wrench into the drum, and position over the fitting. If your drum has two top bungs, look through one while putting the wrench through the other.

Step 7: Have a friend hold the bottom fitting you already inserted, with a set of channel locks or pliers, while you screw the fitting on, hand-tight.
Step 8: After the gorilla glue cures overnight, apply a liberal amount of silicone caulk around the fitting and allow that to cure for a day.
After it's cured, you can add a stand pipe. Here's how I did it....
I used another CPVC adapter, and screwed it onto a 1/2" pipe, and then put a 10" length of 1/2" PVC pipe lightly into the CPVC adapter, WITHOUT glue. I used PVC primer and glue on the other end of the 10" pipe, then inserted it into the drum and pushed it onto the CPVC adapter I'd already installed. I let that cure overnight, then twisted it loose, leaving behind the 10" stand pipe.
Please comment with opinions, rants, or reports of success/failures with this methodology.
![]()
