
Tuesday, August 29
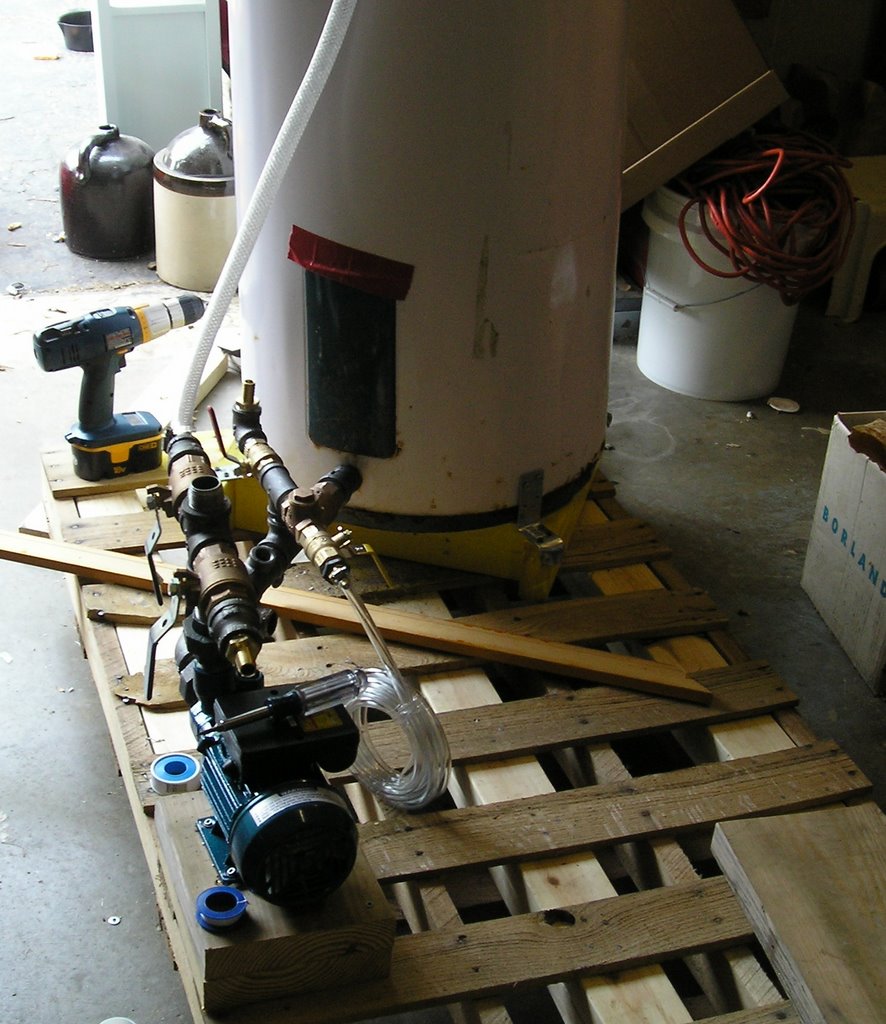
Adding drain and standpipe to closed-head HDPE drum
The "standard" solution for creating a wash tank or oil storage tank seems to be flipping closed-head drums over, and cutting the heads off. I've been trying to find a viable solution that will let me add a bottom drain and standpipe to closed-head drums, so I don't have to deal with all the nasty issues you get with an open head, such as methanol fumes or rain water. Oh, and it also should be able to be performed without welding, since I can't do that, and would ideally work on HDPE drums that I've gotten from carwashes.
Finally, I've found out a method that works, and is (relatively) cheap, especially since it lets me use free drums. So far, I've been able to install 2 bottom drains and 2 stand-pipes without cutting off the head of the drum, and it seems to work great. The key is to get a male and female fitting on either side of the drum, so you can screw/glue fittings onto the bottom. Here are the steps:
Materials List:
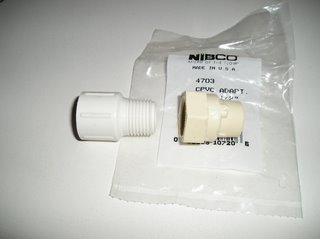
~ 1/2" male PVC fitting, threaded
~ 1/2" CPVC adapter, threaded PVC to slip CPVC (NIBCO part 4703 at Home Depot)
~ 1 3/32" shower valve socket wrench
(I had to buy the complete kit at Home Depot - $22 !!! )
~ 1 small tube Gorilla Glue
~ 1 tube silicone caulk (indoor/outdoor)
~ standard hose washer
~ 3/4" galvanized iron pipe, 4' long
~ 3/4" galvanized tee
~ 2 - 3/4" galvanized 10" pipe nipples
~ 2 - 3/4" galvanized end caps (optional)
~ 1 - bolt, nut, washer, lock washer
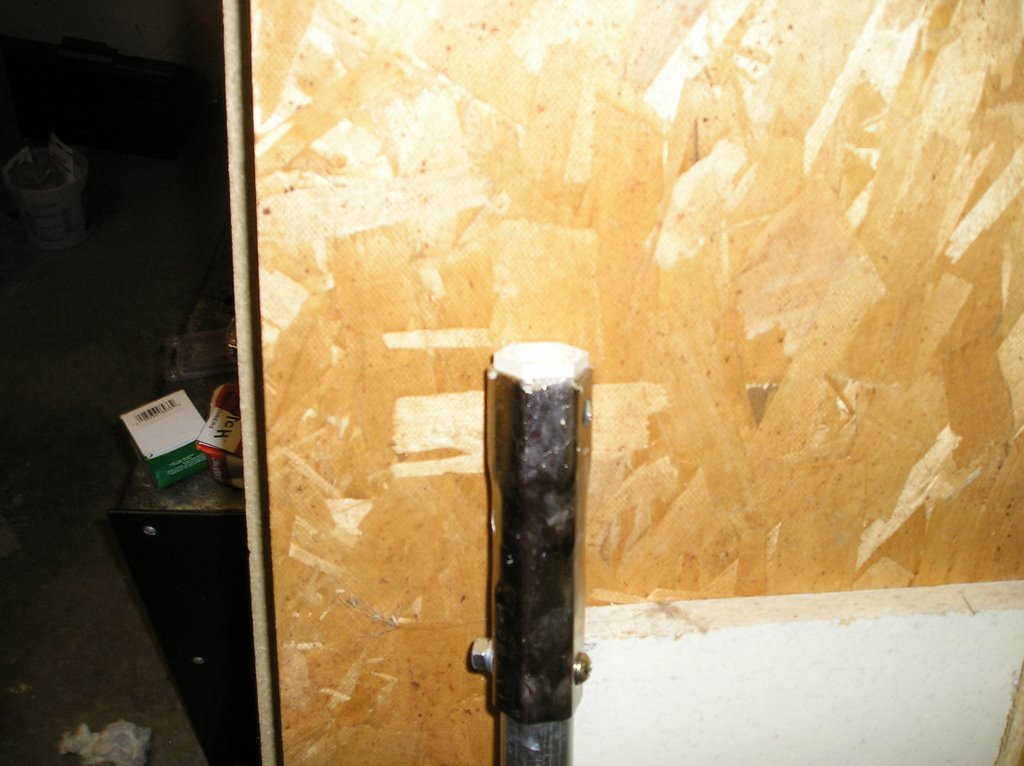
Assembling the fitting wrench:
1) Insert the shower valve socket wrench over the end of the 4' pipe, making sure you put the right end on (make sure the CPVC adapter fits inside the fitting).
2) Drill through the iron pipe, through the hole in the top of the shower valve socket wrench. Drill through both holes.

3) Insert bolt through the hole you just drilled, put washer and lock washer on bolt, then nut, and tighten. It shouldn't stick out very far, since you want it to fit through a 2" fitting.
4) Thread the 3/4" Tee onto the other end of the pipe, and the two nipples onto the tee. Put end caps on the nipples if you like. You can hand-tighten all these. I chose galvanized so it wouldn't rust from exposure to water.
You now have a wrench that can tighten fitting in the bottom of a drum!
Now, for the fitting assembly:
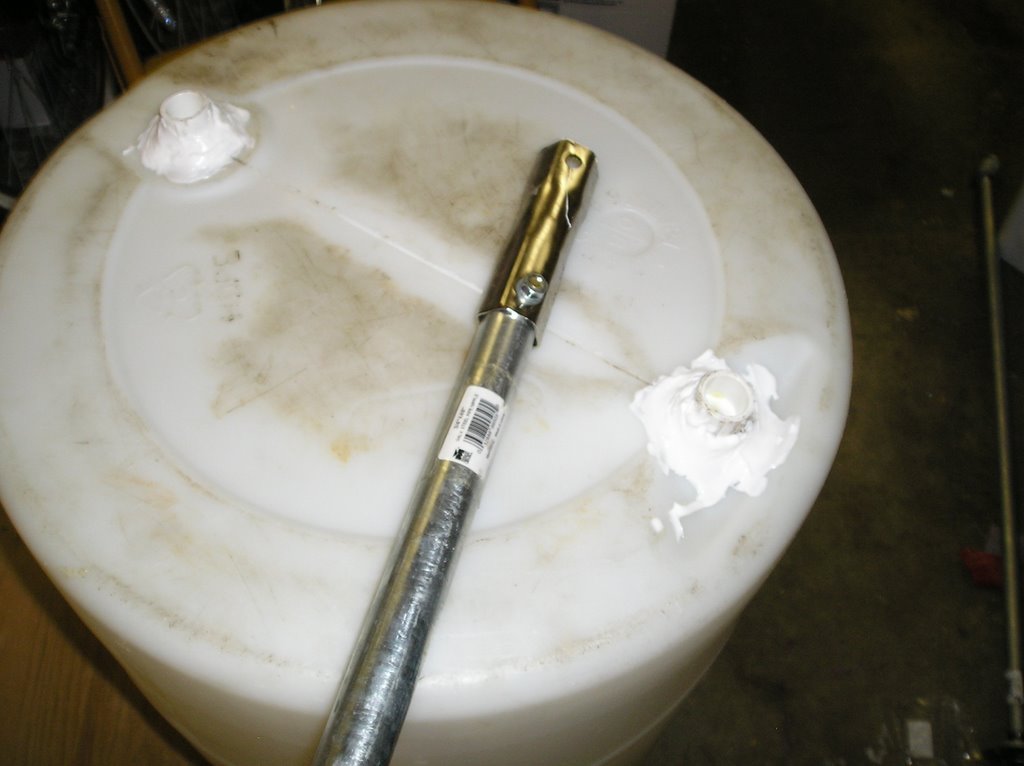
Step 1: Drill a 3/4" hole in the bottom of the drum, directly below one of the top bungs. 3/4 is slightly too small, and 13/16 is slightly too big (but OK), so your mileage may vary. If you're just adding a bottom drain, use a 3/4" bit, so it will hold itself while the glue sets.
Step 2: Put on gloves, because Gorilla Glue stains human skin!
Step 3a: Trial run for fit. Put a standard hose washer on a male 1/2" PVC fitting, and screw it by hand into the hole you drilled, trying to keep it as straight as possible. Look into the drum, to see how much thread is available. Depending on the thickness of the HDPE, you may not have enough thread sticking out with the hose washer on the fitting to attach on the inside. (If you're just adding a bottom drain, you don't need threads, provided it's a VERY snug fit. If you want a stand pipe, you're going to want threads.) If enough threads aren't showing (the fitting is nearly flush on the inside), take off the hose washer, or push it higher up on the fitting, and try again. Now, take it out of the hole, and proceed with glue.
Step 3b: Rub a bit of water on the fitting, and around the hole. Put a liberal but not insane amount of gorilla glue at the top of the threads (the middle of the fitting), and around the hole you drilled in the drum.
Step 4: Screw the male fitting back into the hole. If all you wanted was a bottom drain, you're done.
Step 5: Put the 1/2" CPVC fitting on the 4' fitting wrench you made. I had real problems with it falling out or going to deep, so I stuffed some plastic bag down inside the fitting, and put a bit of ABC chewing gum on the inside side of the wrench to hold the CPVC fitting. I also put a liberal amount of gorilla glue on the threads and on the surface of the fitting that will be in contact with the drum.
I found the next few steps easiest with the drum on it's side, on a few milk crates.
Step 6: Insert the wrench into the drum, and position over the fitting. If your drum has two top bungs, look through one while putting the wrench through the other.

Step 7: Have a friend hold the bottom fitting you already inserted, with a set of channel locks or pliers, while you screw the fitting on, hand-tight.
Step 8: After the gorilla glue cures overnight, apply a liberal amount of silicone caulk around the fitting and allow that to cure for a day.
After it's cured, you can add a stand pipe. Here's how I did it....
I used another CPVC adapter, and screwed it onto a 1/2" pipe, and then put a 10" length of 1/2" PVC pipe lightly into the CPVC adapter, WITHOUT glue. I used PVC primer and glue on the other end of the 10" pipe, then inserted it into the drum and pushed it onto the CPVC adapter I'd already installed. I let that cure overnight, then twisted it loose, leaving behind the 10" stand pipe.
Please comment with opinions, rants, or reports of success/failures with this methodology.
Finally, I've found out a method that works, and is (relatively) cheap, especially since it lets me use free drums. So far, I've been able to install 2 bottom drains and 2 stand-pipes without cutting off the head of the drum, and it seems to work great. The key is to get a male and female fitting on either side of the drum, so you can screw/glue fittings onto the bottom. Here are the steps:

Materials List:
~ 1/2" male PVC fitting, threaded
~ 1/2" CPVC adapter, threaded PVC to slip CPVC (NIBCO part 4703 at Home Depot)
~ 1 3/32" shower valve socket wrench
(I had to buy the complete kit at Home Depot - $22 !!! )
~ 1 small tube Gorilla Glue
~ 1 tube silicone caulk (indoor/outdoor)
~ standard hose washer
~ 3/4" galvanized iron pipe, 4' long
~ 3/4" galvanized tee
~ 2 - 3/4" galvanized 10" pipe nipples
~ 2 - 3/4" galvanized end caps (optional)
~ 1 - bolt, nut, washer, lock washer
Assembling the fitting wrench:
1) Insert the shower valve socket wrench over the end of the 4' pipe, making sure you put the right end on (make sure the CPVC adapter fits inside the fitting).
2) Drill through the iron pipe, through the hole in the top of the shower valve socket wrench. Drill through both holes.
3) Insert bolt through the hole you just drilled, put washer and lock washer on bolt, then nut, and tighten. It shouldn't stick out very far, since you want it to fit through a 2" fitting.
4) Thread the 3/4" Tee onto the other end of the pipe, and the two nipples onto the tee. Put end caps on the nipples if you like. You can hand-tighten all these. I chose galvanized so it wouldn't rust from exposure to water.
You now have a wrench that can tighten fitting in the bottom of a drum!
Now, for the fitting assembly:
Step 1: Drill a 3/4" hole in the bottom of the drum, directly below one of the top bungs. 3/4 is slightly too small, and 13/16 is slightly too big (but OK), so your mileage may vary.
 If you're just adding a bottom drain, use a 3/4" bit, so it will hold itself while the glue sets.
Step 2: Put on gloves, because Gorilla Glue stains human skin!
Step 3a: Trial run for fit. Put a standard hose washer on a male 1/2" PVC fitting, and screw it by hand into the hole you drilled, trying to keep it as straight as possible. Look into the drum, to see how much thread is available. Depending on the thickness of the HDPE, you may not have enough thread sticking out with the hose washer on the fitting to attach on the inside. (If you're just adding a bottom drain, you don't need threads, provided it's a VERY snug fit. If you want a stand pipe, you're going to want threads.) If enough threads aren't showing (the fitting is nearly flush on the inside), take off the hose washer, or push it higher up on the fitting, and try again. Now, take it out of the hole, and proceed with glue.
Step 3b: Rub a bit of water on the fitting, and around the hole. Put a liberal but not insane amount of gorilla glue at the top of the threads (the middle of the fitting), and around the hole you drilled in the drum.
Step 4: Screw the male fitting back into the hole. If all you wanted was a bottom drain, you're done.
Step 5: Put the 1/2" CPVC fitting on the 4' fitting wrench you made. I had real problems with it falling out or going to deep, so I stuffed some plastic bag down inside the fitting, and put a bit of ABC chewing gum on the inside side of the wrench to hold the CPVC fitting. I also put a liberal amount of gorilla glue on the threads and on the surface of the fitting that will be in contact with the drum.
I found the next few steps easiest with the drum on it's side, on a few milk crates.
Step 6: Insert the wrench into the drum, and position over the fitting. If your drum has two top bungs, look through one while putting the wrench through the other.

Step 7: Have a friend hold the bottom fitting you already inserted, with a set of channel locks or pliers, while you screw the fitting on, hand-tight.
Step 8: After the gorilla glue cures overnight, apply a liberal amount of silicone caulk around the fitting and allow that to cure for a day.
After it's cured, you can add a stand pipe. Here's how I did it....
I used another CPVC adapter, and screwed it onto a 1/2" pipe, and then put a 10" length of 1/2" PVC pipe lightly into the CPVC adapter, WITHOUT glue. I used PVC primer and glue on the other end of the 10" pipe, then inserted it into the drum and pushed it onto the CPVC adapter I'd already installed. I let that cure overnight, then twisted it loose, leaving behind the 10" stand pipe.
Please comment with opinions, rants, or reports of success/failures with this methodology.
Saturday, August 26
Processor nearing completion
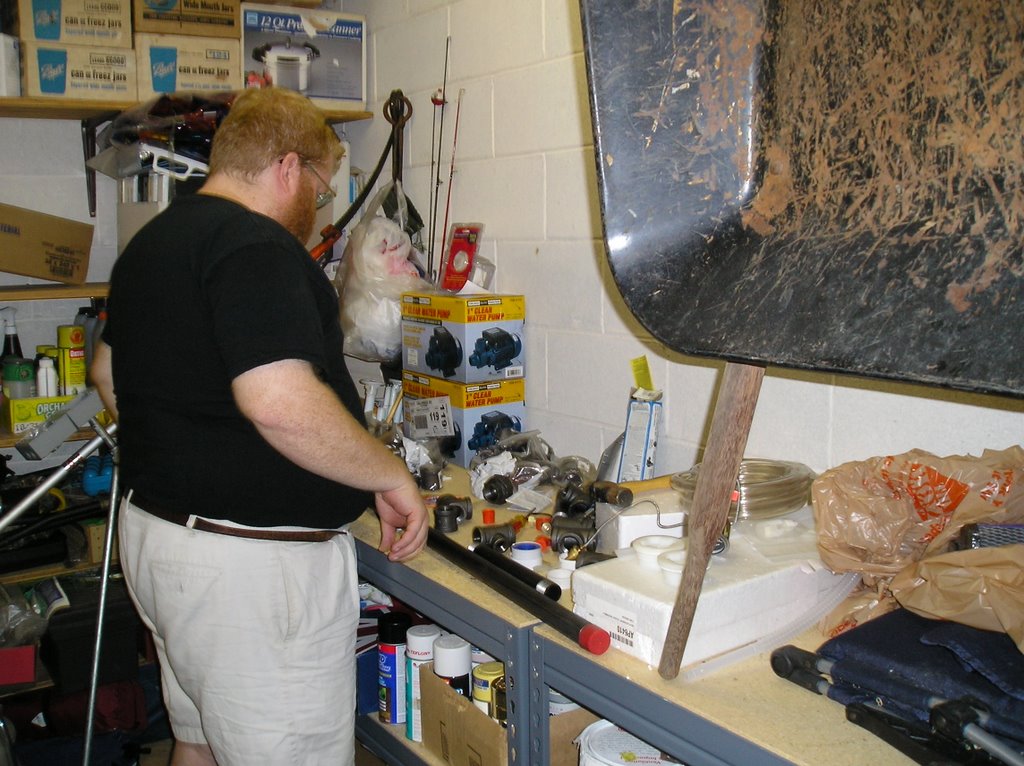
I spent the last two days doing some serious wrenching and fabrication on the processor, including building the supports, most of the plumbing, and planning for substantial additions to the base Appleseed processor (more on this later). After two long days, seriously sore muscles, and several cuts and trips to Home Depot, the processor is nearly ready to launch. I also acquired 210 pounds of virgin vegetable oil at GFS for $.40 per pound, which I think is about $2.40 per gallon. That will be my first batch, so I can both measure the oil going in with accuracy, and also will remove any issues of titration. Add to that the 74 gallons of filtered oil in my driveway, and I have enough fuel to get through the next 3 months.
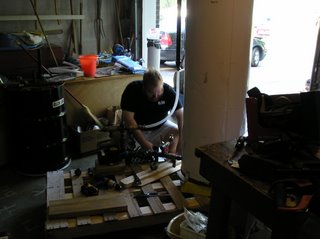
But, back to fabrication. I had to work through several challenges, not a few of which were caused by some errors in assembly -- including two valves I put on, only to realize afterwards that operating the valve would obscure a fitting that I planned to fill with a pipe within the hour. Oops! I decided to put the processor and two wash tanks on the same platform, but picked up a second pump at Harbor Freight so that I can filter my oil to 5 microns without introducing glycerin back into the equation.
Now for the extras that are adding to the fabrication:
>> Making an attractive layout that I can show to the press, schools, whatever
>> Processor and oil tanks mounted on narrow pallets (skids) that fit alongside my garage
>> Mounting the skids on heavy-duty wheels so they can be moved and re-arranged

>> Securing the processor components to keep them sealed and safe, while still moveable
>> Fabrication of a 4 foot wrench, enabling me to add bottom drains and stand pipes to (free) closed-head plastic drums
>> Control panel with sealed weatherproof switches and grounding
>> Painting for weatherproofing of the iron fittings and drums
>> Changing appleseed design to use 1" pipe and valves to maximize throughput, and use cheap valves

This last is the most significant change, since it means that the parts list that is provided with Girl Mark's Biodiesel manual is invalid. You wouldn't think that it would be that big an impact, but it was huge... I had to make 3 trips to Home Depot in the past 3 days, and the last two were to pickup fittings I hadn't anticipated.
I'm pretty excited about the 4 foot wrench that I finally figured out how to fabricate, namely because it should let me readily add fittings to the bottom of closed-head plastic drums I get free from carwashes. If it works, it will means that I can make tanks for oil settling and dewatering, washing, settling, and storage, for about $2 per drum. OK, the wrench cost me $28 in components to fabricate, but that's pretty cheap once spread across dozens of drums.
It still has some rough edges, and I'm having difficulty keeping the fitting from falling out of the wrench when I insert it into the drum, so it's far from complete. However, I did install two fittings tonight with it. The first was a failure, due to glue issues that messed up the male fitting that I'd screwed into the hole from the bottom, but should still provide a bottom drain. The standpipe I installed looks solid, and I'll see tomorrow if they hold water. Once I confirm that it works, I'll post pictures and details on this blog.

But, back to fabrication. I had to work through several challenges, not a few of which were caused by some errors in assembly -- including two valves I put on, only to realize afterwards that operating the valve would obscure a fitting that I planned to fill with a pipe within the hour. Oops! I decided to put the processor and two wash tanks on the same platform, but picked up a second pump at Harbor Freight so that I can filter my oil to 5 microns without introducing glycerin back into the equation.
Now for the extras that are adding to the fabrication:
>> Making an attractive layout that I can show to the press, schools, whatever
>> Processor and oil tanks mounted on narrow pallets (skids) that fit alongside my garage
>> Mounting the skids on heavy-duty wheels so they can be moved and re-arranged
>> Securing the processor components to keep them sealed and safe, while still moveable
>> Fabrication of a 4 foot wrench, enabling me to add bottom drains and stand pipes to (free) closed-head plastic drums
>> Control panel with sealed weatherproof switches and grounding
>> Painting for weatherproofing of the iron fittings and drums
>> Changing appleseed design to use 1" pipe and valves to maximize throughput, and use cheap valves

This last is the most significant change, since it means that the parts list that is provided with Girl Mark's Biodiesel manual is invalid. You wouldn't think that it would be that big an impact, but it was huge... I had to make 3 trips to Home Depot in the past 3 days, and the last two were to pickup fittings I hadn't anticipated.
I'm pretty excited about the 4 foot wrench that I finally figured out how to fabricate, namely because it should let me readily add fittings to the bottom of closed-head plastic drums I get free from carwashes. If it works, it will means that I can make tanks for oil settling and dewatering, washing, settling, and storage, for about $2 per drum. OK, the wrench cost me $28 in components to fabricate, but that's pretty cheap once spread across dozens of drums.
It still has some rough edges, and I'm having difficulty keeping the fitting from falling out of the wrench when I insert it into the drum, so it's far from complete. However, I did install two fittings tonight with it. The first was a failure, due to
 glue issues that messed up the male fitting that I'd screwed into the hole from the bottom, but should still provide a bottom drain. The standpipe I installed looks solid, and I'll see tomorrow if they hold water. Once I confirm that it works, I'll post pictures and details on this blog.
Friday, August 25
Bullwinkle and Biodiesel
 As Bullwinkle often said to Rocky, after pulling a lion out of his hat instead of a rabbit,"Oops! Don't know my own strength!" I was tightening a fitting when assembling my biodiesel processor, and was really torquing down a ball valve, and there was very little clearance on the near end where it was being attached to a pipe nipple, so I started wrenching on the other end, really tightening it up. I remembered today why it is that you don't tighten a brass fitting on the end away from where you're attaching it, as you can see from the 1" ball valve to the right. I superimposed a circle on the photo, so you'd notice that the fitting will no longer fit. Trashed another fitting, but I'm really glad I only paid $2 for the valves, instead of the full retail $14.
Thursday, August 24
Significant progress in fabrication
I have several vacation days I'm taking between jobs, so am going to slog away at my processor, and hope to get it done ASAP.... so, stay tuned!
Monday, August 7
Ohio State Fair
Saturday was a fun-filled day at the Ohio State Fair, a fantastic family event that even tied into biodiesel. Yes, our fun day included losing Emily twice, the first time ironically on the way to get Lost Child tags at the Cardinal Gate, and the other for 45 harrowing minutes in the Commercial Building as Becca and I walked around with State Troopers that had mobilized to find her. We walked until I was so exhausted I fell asleep lying down on the hard asphalt under a tent, and ended the day with a call to Poison Control when Rachael decided the glowing center to luminescent bracelets looked tasty.
Oh, and two biodiesel tie-ins: I finally found a 11" wide-mouth funnel, at a wine-making exhibit in the Commercial Building, which was great to find for only $5, and will keep us from using cut-open milk jugs. Also, the Ag Center had a Biodiesel display, obviously by Big Soy, that included a "Biodiesel vehicle" and a few drums of (allegedly) biodiesel. I wasn't too happy for them to display a "Biodiesel Vehicle", as that reinforces the fallacy that modifications are required to burn biodiesel. However, I did take the opportunity to sprinkle MidOhio Biofuel Co-op business cards liberally over the vehicle and drums, in the hope that passers-by will pick up the cards. Becca hinted that my doing so might precipitate my third run-in with state troopers that day, but her fears seem unfounded. So far, no calls from either law enforcement or interested parties, but it's still early.
Oh, and two biodiesel tie-ins: I finally found a 11" wide-mouth funnel, at a wine-making exhibit in the Commercial Building, which was great to find for only $5, and will keep us from using cut-open milk jugs. Also, the Ag Center had a Biodiesel display, obviously by Big Soy, that included a "Biodiesel vehicle" and a few drums of (allegedly) biodiesel. I wasn't too happy for them to display a "Biodiesel Vehicle", as that reinforces the fallacy that modifications are required to burn biodiesel. However, I did take the opportunity to sprinkle MidOhio Biofuel Co-op business cards liberally over the vehicle and drums, in the hope that passers-by will pick up the cards. Becca hinted that my doing so might precipitate my third run-in with state troopers that day, but her fears seem unfounded. So far, no calls from either law enforcement or interested parties, but it's still early.
Thursday, August 3
Danger, Danger Will Robinson!!
I missed a vital observation when creating mobile pallets.... while the short pallet I was using under my (FULL) oil drum was reinforced down the length with solid 2x4s, the one I put wheels on for my other pallet only had 4x4 blocks at the corners, binding the top of the skid to the bottom. I totally missed that when affixing the 300-lb super-heavy-duty casters to the corner blocks. I figured, heavy-duty skid with heavy-duty casters, no problem. Oops.
Fortunately for me, my wife noticed that, after I muscled (OOF!) the 500 pound full oil drum from one skid to the other that the 4x4 blocks were twisting under the load, and were likely going to break. We quickly shimmed the pallet with 2x12 lumber, and I quickly reinforced the pallet that the drum had just been on. 150 nails and two 2x4s later, I had reinforced the other pallet, affixed more heavy-duty casters, and got the drum muscled back (OOF!) to the newly reinforced pallet, before disaster struck. Whew! So much for quickly moving the drum and then doing more fabrication. At least I learned a lesson without spilling 55 gallons of waste fryer oil in my driveway.
Fortunately for me, my wife noticed that, after I muscled (OOF!) the 500 pound full oil drum from one skid to the other that the 4x4 blocks were twisting under the load, and were likely going to break. We quickly shimmed the pallet with 2x12 lumber, and I quickly reinforced the pallet that the drum had just been on. 150 nails and two 2x4s later, I had reinforced the other pallet, affixed more heavy-duty casters, and got the drum muscled back (OOF!) to the newly reinforced pallet, before disaster struck. Whew! So much for quickly moving the drum and then doing more fabrication. At least I learned a lesson without spilling 55 gallons of waste fryer oil in my driveway.
Tuesday, August 1
Drums back from welder
My welding buddy, Scott, did an awesome job with the drums. They now have bottom drains plumbed with 1" pipe, and two 3/4" pipes coming into the same side bung on the bottom, so now I can drain my wash drums, and also have a standpipe and input from the side of the drum. He even used a grinder to get all the welding bumps off, and it looks great. I shot it with some of that magic rust converter, and it's sweet!
![]()
